"A garden requires patient labor and attention. Plants do not grow merely to satisfy ambitions or to fulfill good intentions. They thrive because someone expended effort on them." -Liberty Hyde Bailey
 |
| Drip Irrigation Lines Among the Newly Transplanted Squashes - 2020 |
Drip irrigation is the way to go and is far superior to other watering methods. It's more time intensive initially and despite the fact that the parts do cost more than a hose it pays for itself in the long run in efficiency, ease of use, reliability, and time savings. Once built, you can add a timer so you don't even have to think about watering, it just happens automatically per the timer you set. Right now you might be thinking that just watering with a hose won't be a big deal and you'll have time for it each day. I guarantee you that when mid-summer rolls around you'll be cursing yourself for going that route as you'll likely have better things to do whether they pertain to the garden or not. Plus when you water overhead, a lot of the water is going to evaporate anyways so you might as well get the most bang for the water you're paying for. Plants don't really even need water on their leaves, while they can absorb water through their leaves they mostly drink from their roots. Overhead watering is kind of like someone trying to give you water by pouring water on top of your head. It can be done and some of that water will make it into your mouth but it's really not that efficient. You'll want to plan out your drip irrigation system now, get the parts, and build it in the early spring (after your landscaping fabric or mulch is put down).
Plan Your Drip System
DripWorks is a great resource not only for irrigation parts but potential plans in their Gallery of Plans. Which is a tremendous resource so you can find and build the system that works best for you. My system is basically a variation of the Row Crop Plan 2. It has worked out very well for me and I wouldn't change a thing about it. When I bought parts for it I bought an excess of parts so I can replace them later if they break, which was a good choice. Each year there's usually a few small pieces that need to be replaced and there's usually a drip tape casualty or two as a result of the fire pit or a hoe. Look through their plans and parts, see what's going to be best for you, do that, and tweak as needed.
The hardest part that I ran into when planning out my system was figuring out how to get the water from the spigot to the actual system without putting too much pressure on the system / drip tape. Here's what I came up with for that:
 |
| Contraption that connects my water spigot to the drip irrigation system |
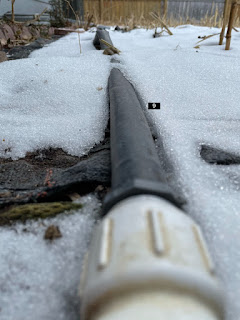
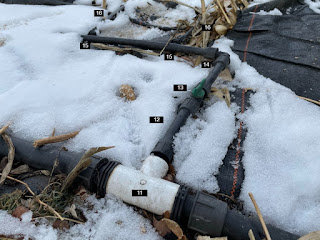
Click on Photos to see Corresponding Numbers
0. Hose Extender (not pictured but is a small, 5 foot hose that goes from the spigot to this contraption to fuel your irrigation system)
1. Female hose connector (your hose extender connects to this)
2. Adapter to go from female hose connector to Union Ball Valve below (3/4 inch to 1 inch)
3. Union Ball Valve - 1"
4. Filter - 1" Amiad Tagline 200 Mesh
5. Medium Flow Regulator 25 PSI
6. 1" to 1" adapter
7. Check Valve 1" FPT
2. Adapter to go from female hose connector to Union Ball Valve below (3/4 inch to 1 inch)
3. Union Ball Valve - 1"
4. Filter - 1" Amiad Tagline 200 Mesh
5. Medium Flow Regulator 25 PSI
6. 1" to 1" adapter
7. Check Valve 1" FPT
8. Adapter to 1" Mainline
For the adapters, I bought a few male and female adapters and mix and mashed parts until everything fit together so it's a bit of a macgyvered contraption but it works. I put plumbers tape when connecting everything together to prevent any leaks. Are all those parts necessary? I don't have the slightest idea but while I was buying parts I figured I might as well be safe rather than sorry. I wanted a way to turn everything off quickly and easily in case something went horribly wrong (union ball valve) as well as for the winter time so critters don't crawl in there. The filter is likely not needed at all since I'm on city water and not a well, but if I ever want to add rain barrels then I'm all set for filtering it. The flow regulator keeps the driplines from getting over-pressured and the check valve keeps water flowering out to the yard, it isn't possible for it to flow back into the house with the check valve (which is good). If I were building this again I would have all of the same parts as it works great.
After that contraption that looks like it could be in a star wars movie, the main irrigation system is very straight forward. It's a 1" mainline with 1/2" poly tube splitting off of it, then off of each 1/2" line there are two drip tape lines. Each 1/2 Poly tube has a valve so I can individually turn on / off each set of drip tape lines, which mostly get used at the beginning of the growing season.
9. 1" mainline13. 1/2" Easy Loc Coupler with Valve - on / off switch for each poly tube
14. 1/2" Easy Loc Elbows - gets your polytube facing the right direction for the drip tape to split off of it.
15. Tap Loc with 1/4" barb - allows you to connect the 1/2" poly tube to the drip tape
16. Drip Tape - 8 mil - 4" OC - Medium - The drip tape that waters your plants
At the end of each drip tape line just tie a simple knot in the drip tape instead of buying something to crimp the ends. The figure 8 contraptions are useless, a knot is much better.
At the very end of your 1" mainline, you just need to plug it.
You'll need a 1/4" hole punch to punch holes in your 1/2" poly tubing so you can get the 1/4" barbs connected to them. It's a bit of pain to do but you'll get the hang of it pretty quick. They do sell Goof Plugs that you can use if you punch a hole in the wrong place, it's usually easier to replace what you messed up instead of messing with the plug and seeing if it holds throughout the summer.
This might seem complicated but it's actually pretty simple to build, plus now you have an example drip irrigation plan to go off of and adjust to your liking! It's just like putting legos together! Dripworks has mass amounts of parts so there are a lot of variations that you can make, this is just what I came up with.
If you have a smaller space where a drip irrigation system seems overkill, look into soaker hoses. These are permeable hoses that purposely leak water out of the hose to water your plants. They're pretty reasonably priced, you can usually connect multiple soaker hoses together and you can even bury them if you want to.
Feel free to comment below if you have any questions, if you made this and it worked for you, if it did not work for you, if you have any additional ideas, comments, concerns, etc.
Note: After you've built your own irrigation system you'll be all set for starting your own irrigation side hustle if you ever want to build these systems for other people in your town!


Awesome.
ReplyDeleteThank you James for this valuable article and introducing Dripworks. Dripworks.com is a great place. I loved there drip planning guide
ReplyDeletehttps://www.dripworks.com/resources/drip-planning-guide
You're welcome, I'm glad you like it!
Delete