"Why Buy Something When You Can Build It?"
-Someone at some point in history
Building your very own PVC trellis is very easy, it doesn't take much time (as far as building things goes), plus they're relatively cheap and durable. If you're looking for some trellising then look no further, go get some PVC and build it yourself.
You can certainly build a trellis out of pretty much anything you'd like so if you have some extra building material laying around, get creative and build a trellis out of that. I went with PVC for the following reasons: I didn't have a lot of time, I wanted to make it myself, I wanted it to be durable, I wanted it to be light, and I wanted it to be cheap. That all led me to making some not-so fancy but very functional trellising made out of PVC.
If you've never built anything before then you have no need to worry. This is a great project to start with, by the time you're done you'll be making up new garden projects to get creative with and construct.
Materials Needed
-PVC Pipe
-PVC Elbows
-PVC Tees
-Hacksaw
-PVC Cement
-String
-Zipties
-Sandbags for weighing them down after constructed
-Motivation
-Good tunes and/or audiobook
How to Construct
All that you do is measure out the space you want to put your trellis in, determine how wide and tall you want the trellis to be. Then figure out how much piping, elbows, and tees you need. Acquire said piping and materials listed above. Fit it all together, glue the joints with PVC cement. Lash the two trellis sides together with zipties, tie string to make the vertical columns, move the trellis in place and weigh it down with sandbags since these turn into a giant sail once beans take them over. Clear as mud, right?!
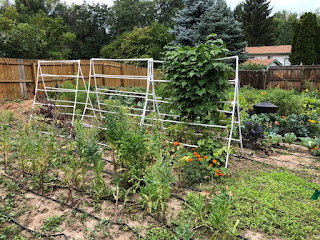
This is what your are going to make:
 |
| Handmade and fully assembled PVC trellis. |
This trellis is 56" tall (5.5 ft) and 61.5" wide. There is a horizontal PVC row about every 13 inches so there are 4 rows in between the top and bottom PVC rows. The strings that run vertically are placed about every 14 inches.
1. Make the border of the trellis first. Cut and put two 56" pieces of PVC on the ground for the two vertical sides. Then cut and put two 61.5" pieces of PVC on the ground for the top and bottom horizontal pieces. Measure twice, mark the cut points with a sharpie and cut once with your hacksaw.
2. If you want 4 horizontal rows then cut 4 additional 61.5" pieces of PVC and put them on the ground, spacing them about every 13 inches.
3. On the ground you now have a rough outline of your trellis, make sure everything is roughly fitting before moving on.
4. Mark your cut points for the horizontal rows, cut, insert the PVC tees and loosely fit the piping together. Do this on both sides.
5. Connect the top and bottom PVC rows with the PVC elbows.
6. Everything for one side is now loosely fitted together.
7. If everything looks good, take apart each joint one at a time, put PVC cement on it and put it back together.
8. Tie a piece of string about every 14 inches so it runs vertically, tie this string to the top and bottom PVC pipe.
9. Once you have two trellis sides assembled and the PVC cement is dry (it dries really fast), tie the two sides together with a few zip ties.
10. Set the trellis out in the yard and weigh it down with sandbags*.
11. Enjoy your brand new, crafty and creative trellises.
12. Give them a cool paint job so things grow up them better?! I hear flames painted on your trellises will make your plants grow faster!
 |
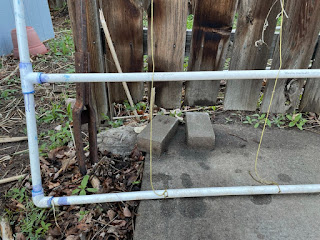
| Horizontal rows out of PVC about every 13 inches, inserted into PVC tees with the bottom row being a PVC elbow. |
 |
| PVC cement all the joints together, I probably should've used more glue, eh? |
 |
| Lash the two trellis sides together with zip ties. |
 |
| Tada, you now have some fancy dancy trellises! |
 |
| Weigh them down with sandbags and use PVC cement on the joints to avoid this not so fun situation. |
In the comments below: How are your trellises working out? Did you use a different material? Did you decorate your trellises? Did your trellises blow over? What is your favorite type of turtle?

No comments:
Post a Comment